Home assistant energy dashboard setups all start the same way: you need at least one sensor the dashboard can use, and the pages say it only lists sensors with the right attributes. This guide covers five things the dashboard needs, based on Home Assistant’s own documentation. We tested nothing. Where the pages are silent, we say “we could not confirm.”
Table of Contents
What the home assistant energy dashboard actually is
The Energy overview page says the dashboard works with electricity, gas and water, and groups each one into what you consume, what you produce and what you store. It also says you can start with a single source, “even just your electricity meter,” and add more later. Any energy monitor, smart plug, solar inverter or utility meter that integrates with Home Assistant can feed it, according to the same page.
That makes home assistant energy monitoring mostly a question of sensors. The rest of this guide is about which sensors count. We do not give any figures on what you might save. The overview page says automations can help save money but gives no numbers, and we have none of our own.
5 essential things the home assistant energy dashboard needs
1. Electricity data from your meter
The electricity grid page says Home Assistant needs to know how much energy flows through your meter, and calls reading the meter directly “the best way.” It lists several routes, including a P1 port reader, a pulse counter on the meter’s LED, a camera-based reader and the Zigbee Energy Profile (the page says this is not normal Zigbee, needs special certified hardware and is often provisioned by your utility). It also lists CT clamp sensors, and warns that installing them means opening your electrical cabinet, which should be done by someone familiar with wiring and may need a licensed professional in some regions.
To add the data, the page says to go to Settings > Dashboards > Energy, choose Add grid connection, select the statistic for energy consumed from the grid and, if applicable, the one for energy returned. Real-time power is optional, and the page says the energy totals work without it. If your provider uses multiple tariffs, it says to add one grid connection per tariff.
2. Sensors with the right properties
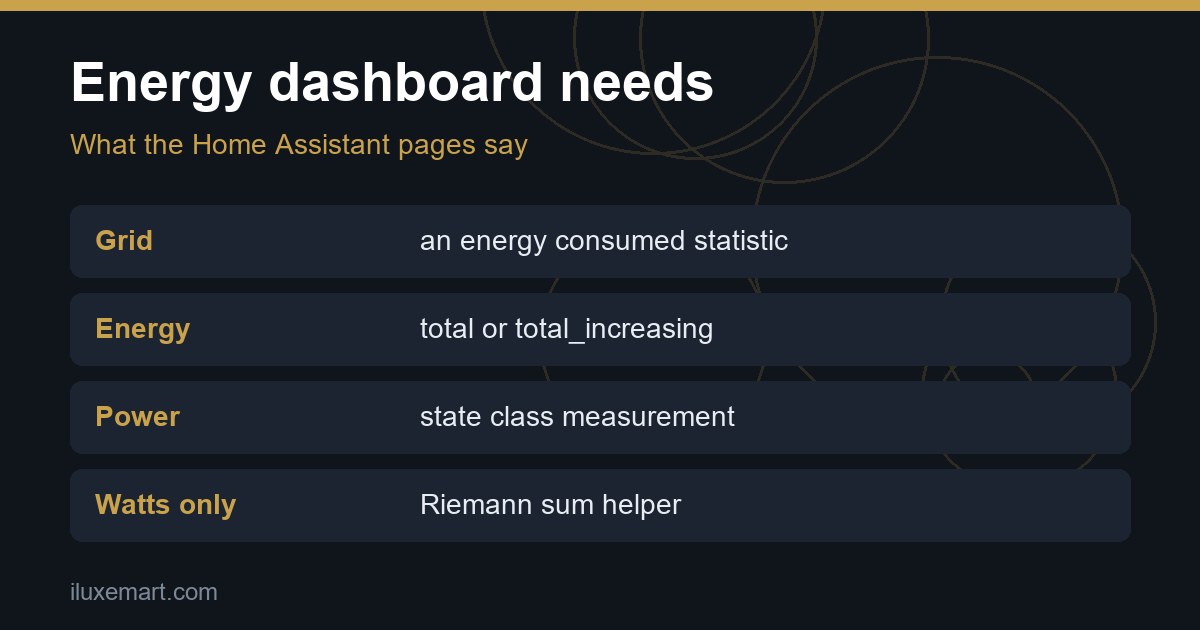
This is where the FAQ’s troubleshooting section starts. The Energy FAQ says the dashboard only lists sensors it can use for the field you are filling in. For the required attributes it lists:
- Energy:
device_class: energywithstate_class: totalortotal_increasing. - Power:
device_class: powerwithstate_class: measurement. - Battery state of charge:
device_class: battery,state_class: measurementand unit%. - Gas:
device_class: gaswithstate_class: totalortotal_increasing. - Water:
device_class: waterwithstate_class: totalortotal_increasing.
The sensor must also be a sensor entity (not, for example, an input_number), use a supported unit and have no statistics errors. The Sensor page explains the vocabulary: the device class says what a sensor measures, the state class says what kind of value it is, and “total increasing” is an amount that only goes up except when it is reset, such as an energy meter. It lists kWh and Wh among the energy units and W and kW among the power units.
If your sensor lacks a property, the FAQ says you cannot change the device class or state class in the entity settings. Its fix is a template sensor helper that copies the value and has the correct attributes. If you set up sensors by hand through MQTT or Template, the electricity page says to provide device_class, state_class and unit_of_measurement yourself.
3. A way to turn power into energy
Some devices only report watts. The FAQ explains the difference: power is how fast energy is used, energy is how much, and the dashboard needs the right one. If a device reports only power, it says you can add it as an individual device, solar panels, home consumption, gas or water entry, and a dialog suggests a sensor that can be created from it. That sensor is an Integration (Riemann sum integral) helper. The FAQ adds that new sensors start counting when you create them, so earlier values are not included.
The Integral page says the sensor approximates an integral by a finite sum, keeps its value across restarts, and is more accurate when the source updates often. Its example turns a power sensor in W into kWh.
4. Optional sources: solar, battery, gas, water and single devices
None of these is required; the overview says you can start with a single source. Cards such as the solar card only become available once the matching source is configured.
- Solar: the solar page lists CT clamp sensors and says some inverters have APIs Home Assistant can read.
- Battery: the battery page says some vendors have an API, with Tesla Powerwall as its example.
- Gas: the gas page says the meter is usually the best source.
- Water: the water page says to check a method works with your meter type before buying anything.
- Individual devices: the individual devices page says smart plugs can be Zigbee, Z-Wave or Wi-Fi based. It also describes an “upstream device” setting, so a breaker and the devices on it are not double-counted.
For plug-level data, our smart plug energy monitoring guide covers the hardware side.
5. A recorder that keeps the history
The dashboard reads stored data. The Recorder page says the recorder writes state changes to a database, and that history, dashboard graphs and long-term statistics read from it. The default database is SQLite, stored in your configuration directory as home-assistant_v2.db. The Sensor page adds that Home Assistant saves short-term statistics every 5 minutes, deleted after 10 days by default, and long-term statistics every hour, “never deleted automatically.” A sensor without a state class has no long-term statistics.
The electricity page’s troubleshooting tip follows from this: if you cannot select your energy or power sensor in the grid consumption drop-down, check that its value is being recorded in the Recorder settings.
Integrations the docs mention for home assistant energy monitoring
These are examples, not recommendations. We could not confirm from these pages which of a given maker’s models expose usable energy sensors.
- Shelly. The Shelly page gives IoT class Local Push and lists “Energy Meters & monitoring” among its categories. In its generation 2+ configuration section, the page notes that the integration is communicating directly with the device and that a cloud connection is not needed; we could not confirm this for older generations or for any particular Shelly model. The solar and electricity pages recommend the Shelly EM as an off-the-shelf CT clamp device, with a local API and pushed updates.
- ZHA. The ZHA page gives IoT class Local Polling and supports a Sensor device type. We could not confirm from it which Zigbee devices report energy. It also says ZHA does not support devices that only use the Zigbee Smart Energy profile.
- DSMR. The DSMR page covers, among others, Belgian, Dutch, Luxembourg and Swedish smart meters with a P1 port. It gives IoT class Local Push and lists “Energy Meters & monitoring.” It says Swedish meters with a HAN port are not supported.
Checklist before you open the home assistant energy dashboard
- Find your meter data (item 1) or pick a plug or clamp that fits your country.
- Read the integration page for each device and note its IoT class.
- Check each sensor’s device class, state class and unit under Settings > Tools > States.
- Create a Riemann sum helper for anything that reports only watts.
- Confirm the recorder is keeping the sensor’s values.
- Add one source first, then more.
Honest limits
- We tested nothing. This is a documentation roundup, not a setup log.
- We give no savings figures, tariff rates or prices. The pages give no figures either, though the overview says automations can help save money and the electricity page explains that peak tariffs cost more than off-peak ones.
- Some hardware routes on the electricity page involve opening an electrical cabinet. We have not assessed them.
- Pages change. Re-read yours before you buy.
Home assistant energy dashboard: your next step
Pick one source and check its sensor properties against item 2 before buying hardware. If you are new to Home Assistant, our automation ideas guide is a gentler start, and our smart lights without a cloud account guide covers another device type. More guides are in our no-subscription smart home guides.
How we checked
We read each page below on 16 November 2026. This is a documentation roundup; we did not test any device, sensor or setup. Claims marked “in our view” are our own reasoning.
Sources read 16 November 2026: Home Assistant, Home energy management, Home Assistant, Electricity grid, Home Assistant, Solar panels, Home Assistant, Home batteries, Home Assistant, Gas usage, Home Assistant, Water usage, Home Assistant, Individual devices, Home Assistant, Energy FAQ, Home Assistant, Sensor, Home Assistant, Integral, Home Assistant, Recorder, Home Assistant, Shelly, Home Assistant, Zigbee Home Automation, Home Assistant, DSMR Smart Meter.
More in this series: No-subscription and private smart home guides.